Tag: gamedesign

  • Designing Games from a UI/UX Perspective

    Most game designers begin their projects with scribbled notes in sketchbooks, loose ideas on sticky notes, or detailed concepts written in Word documents. This approach can be effective for capturing raw ideas, but it often leaves critical gameplay elements undefined. What if you began instead by designing the user interface and user experience ?

    Starting your game project from a UI/UX perspective doesn’t mean skipping creative ideation. It means anchoring those ideas in visual structure and interaction early on. This approach helps you visualize how your game will look and feel, test assumptions, discover hidden features, and define platform specific behavior before writing a single line of code.

    In this guide, we’ll walk through the benefits of starting with UI/UX, outline a detailed process, provide examples from real world projects, and recommend tools to help you bring your vision to life.

    Author’s Note: This article is written for game designers of all levels. Whether you’re an indie dev, a student, or a team lead at a studio, starting from UI/UX can enhance your design thinking and production pipeline. Try it on your next prototype and watch your ideas take form faster than ever.


    Why Start with UI/UX ?

    1. Visual Clarity Early On

    Creating UI/UX wireframes gives you an immediate visual anchor. You can understand screen layout, information hierarchy, and user flow at a glance. This helps clarify gameplay concepts and surface challenges that aren’t obvious in text.

    2. Platform and Control Compatibility

    Designing with UI/UX first forces you to consider your target platform. Is the game mobile first ? Will players use a touchscreen, mouse, or controller ? Sketching your interface helps determine what feels natural, what fits the screen size, and how much information the player can process at once.

    3. Gameplay Discovery and Iteration

    When you design how players interact with the game, you often discover mechanics you hadn’t thought of. For example, when designing an inventory UI, you might decide to add item crafting simply because the interface suggests the possibility. UI mockups help explore these possibilities faster than prose or code.

    4. Team Communication and Rapid Feedback

    A visual mockup is easier for your team to interpret than a written description. Developers, artists, and producers can align around the same vision faster, leading to quicker iteration and fewer misunderstandings.

    5. Smooth Transition to Documentation and Prototyping

    Once you have a complete UI/UX flow, translating that into a formal Game Design Document (GDD) becomes much easier. The mockups serve as both a visual prototype and a roadmap.


    The UI/UX-First Design Process

    Step 1: Sketch Core Screens

    Start with the essential screens:

    • Main menu
    • Gameplay interface
    • Pause screen
    • Game over screen
    • Settings or upgrade menus

    You can do this on paper, whiteboards, or using wireframing tools. Focus on layout, not aesthetics.

    Step 2: Define Player Interactions

    Ask: What can the player do on each screen ? Are they swiping, tapping, clicking, dragging ? What feedback do they receive ? Mapping these interactions helps you define the gameplay loop and detect missing elements.

    Step 3: Build Flow Diagrams

    Create a navigation map showing how players move between screens. This highlights UX flow and reveals potential issues, like dead ends or confusing loops. Tools like Whimsical, Miro, or Figma’s flowchart tools work well here.

    Step 4: Simulate Gameplay Mechanics

    Use your wireframes to simulate core gameplay actions. How does the player start a level ? What happens when they win or lose ? Sketch mini scenarios to understand the players journey. You’ll often spot logic holes or moments where the player needs more feedback.

    Step 5: Iterate with Feedback

    Test your UI sketches with teammates or play testers. Even without a working prototype, you can use static wireframes or clickable prototypes to gather feedback. Note what’s confusing, what needs explanation, or what can be streamlined.

    Step 6: Layer in Game Feel and Visual Hints

    Once structure is solid, start thinking about how the interface supports your game tone and feel. Does the layout communicate a frantic pace (like in a roguelike) or a thoughtful, strategic rhythm (like in a city builder) ? Add mood notes, animations, and visual references.


    Case Studies and Examples

    Example 1: Mobile Endless Runner

    A small team began by wireframing their core gameplay screen. They quickly realized that placing the jump and slide buttons on the same side of the screen made one handed play difficult. This insight led to a major control redesign that made the game more accessible.

    Example 2: Strategy Game for PC

    While mocking up the heads up display (HUD), the team realized that the minimap and unit panel competed for the same screen space. This early catch avoided a UI collision that could have caused major rework during development.

    Example 3: Educational Puzzle Game

    By building UI flows first, designers found a natural opportunity to insert learning prompts between levels. These weren’t part of the original concept but became a key feature that improved engagement.


    Recommended Tools

    You don’t need a massive toolset to get started. Here are a few accessible options:

    • Figma / Adobe XD – Industry standards for UI design, with collaborative and prototyping features.
    • Whimsical / Miro – Great for mapping UX flows and feature diagrams.
    • Pen & Paper – Still incredibly fast and effective for early ideation.
    • Unity UI Builder / Unreal UMG – In engine UI tools to connect layout with actual gameplay early.
    • Trello / Notion – Organize your interface ideas, game flow, and screen references.

    Transitioning to a Game Design Document (GDD)

    Once your UI/UX sketches and flow diagrams are in place, turning them into a structured GDD becomes a smoother process. Use your mockups to:

    • Define each game screen and interaction
    • Outline core loops and reward structures
    • Identify asset needs (buttons, icons, screens)
    • Detail how players receive feedback and progress

    In other words, your UI/UX becomes a living backbone for your GDD, not a separate or afterthought element.


    Real World Example

    References

    When I worked on the design for Gunner Fury, I started with the UI/UX. I looked for references that matched my idea. Several games could be used for inspiration, and I chose a submarine simulation game called Cold Waters. I took some screenshots that suited the main interface camera.

     Camera Navigation

    The main camera in the game can move freely, following mouse input. I needed information that clearly indicated both the camera direction and the heading of the warship I was controlling or observing. To improve situational awareness, I decided to add a compass marker at the top of the screen, along with key supporting information.

    Weapon and Sensor Interface

    The warship I designed is equipped with modern weapon systems and advanced sensors. To ensure the design accurately represents the technological capabilities and the timeline of the game, I needed a visual style that communicates both sophistication and realism. I researched and referenced modern warships that align with the game setting and era, using them as a foundation to shape the look and feel of the vessel in a way that supports immersion and believability in the gameplay experience.

    Weapon Camera

    The warship’s primary weapon systems, particularly the main cannon, are designed to be manually controlled by the player. To enhance this mechanic, I developed a dedicated gun camera interface inspired by real world modern naval vessels. I studied how targeting systems work on actual warships, focusing on elements such as camera tracking, crosshair behavior, and real time feedback for aiming and firing. These references helped me design an interface that feels authentic yet intuitive for players. By integrating this system into the game, I aimed to create a more immersive and engaging combat experience one that gives players a sense of control and precision during naval engagements. This manual targeting feature not only adds tactical depth but also reinforces the modern and realistic tone of the game.

    Ship Coordination and Navigation

    The game is designed to allow players to control multiple ships simultaneously, making fleet management a core gameplay mechanic. To support this, I needed to create an interface layout that effectively communicates several layers of critical information in real time. These include:

    • The exact location and status of each player controlled ship
    • The position of allied or friendly ships
    • The whereabouts of neutral or civilian vessels
    • The movement and threat level of enemy ships
    • A dynamic navigation map to support situational awareness and route planning

    Given the complexity of naval engagements and the need for tactical decision making, it was essential to consolidate all of this data into a single, streamlined interface. I approached the layout design with a focus on clarity, responsiveness, and precision. Each icon, marker, and visual indicator was carefully placed and scaled to avoid clutter while still maintaining immediate readability.

    The interface functions as a command and control center, allowing players to quickly assess the overall battlefield situation, switch between units, and issue strategic commands without losing track of key information. The visual hierarchy and color coding help distinguish between different types of vessels and their threat levels, ensuring the player always knows what’s happening and where.

    This design supports real time fleet coordination and enhances the players ability to respond to evolving combat scenarios, making it a vital component of the gameplay experience.

    Naval Base

    Equally important, I also needed to design an interface for managing the players warships outside of combat. This interface serves as the central hub for all fleet management activities, providing access to key features such as:

    • Repairing damaged ships
    • Upgrading weapon systems, sensors, and hull components
    • Assembling or customizing new warships
    • Selling or decommissioning unused ships
    • And other related maintenance and strategic planning functions

    The goal of this interface is to give players full control over their naval assets in a clear and engaging way. I designed it to feel like a command dock or shipyard control room, where players can review detailed ship stats, apply upgrades, manage resources, and make strategic decisions about their fleet’s development.

    The layout emphasizes usability and information hierarchy. Each ship is represented with visual thumbnails and status indicators, while deeper customization options are available through expandable panels or dedicated screens. Tooltips, visual cues, and confirmation prompts help guide the player through more complex actions, ensuring the interface remains accessible even for new players.

    This system not only supports gameplay progression and resource management but also reinforces the game themes of modern naval strategy and technological advancement. It serves as a critical bridge between combat missions and long term fleet development, making it a core pillar of the overall game experience.

    Transition to Document

    Through the development of this concept, I uncovered several valuable insights that had not been considered in the earlier stages. This process brought new clarity to critical gameplay elements, including ship control schemes, navigation flow, weapon systems, and methods for detecting and engaging enemy targets. These considerations helped shape the foundation of the game core mechanics and user interaction models.

    Once all the required information was gathered and refined, I transitioned from visual ideation to documentation. This involved translating key gameplay systems, interface concepts, and functional requirements into structured written form. The result is a comprehensive Game Design Document that serves as a blueprint for development detailing everything from player interaction and UI behavior to mechanical systems and combat scenarios.

    Download the GDD from the following link – Google Drive


    Final Thoughts

    Designing games from a UI/UX perspective is more than layout and menus it’s about interaction, discovery, and structure. By grounding your creative ideas in user experience early, you improve clarity, encourage better team collaboration, and reduce development risks.

    Next time you start a game project, try reaching for your wireframing tool before your writing software. You might find yourself with a clearer vision, a faster workflow, and a better game.

  • Basic Level Design: Survival Action Shooter Game

    This guide is designed for aspiring level designers and game designers who also take on level design responsibilities. It offers a structured approach to creating an effective Level Design Document (LDD).

    Case Study “The Last Stand: Aftermath”

    To illustrate how to craft a compelling LDD in Notion, this guide will use The Last Stand: Aftermath as the core example. It’s a survival action shooter game, from the creators of The Last Stand: Union City.

    “After you are infected by the zombie virus, set out to explore the apocalypse and find hope for your colony. You can make a difference. Don’t give up.”

    By using The Last Stand: Aftermath as a case study, I’ll show you how to:

    • Structure a clear, actionable LDD
    • Communicate design intent effectively
    • Support collaborative iteration throughout development

    Pre-Documentation Analysis

    Before diving into the LDD, it’s essential to thoroughly analyze the game. Key components to review include:

    • Game Specifications
    • Gameplay and Core Loops
    • Game Mechanics
    • Game Economy
    • Core Features
    • Key Assets
    • Storyline and Lore
    • Missions and Objectives
    • Characters and Factions

    A solid understanding of these elements ensures that your Level Design Document aligns with the overall game design and communicates a cohesive vision.

    Why Use Notion for LDD ?

    I strongly recommend using Notion as your primary tool for game documentation. With its intuitive interface, rich content formatting, and seamless real-time collaboration, Notion is one of the most versatile platforms for generating, organizing, and sharing game design materials. Whether you’re working solo or as part of a team, Notion keeps everything accessible, structured, and connected.

    Ready ? Let’s head to Notion – The Last Stand: Aftermath

  • Writing a Basic Level Design Document

    This guide is designed for aspiring level designers and game designers who also take on level design responsibilities. It offers a structured approach to creating an effective Level Design Document (LDD).

    Case Study “BATTLETECH”

    To illustrate how to craft a compelling LDD in Notion, this guide will use BATTLETECH as the core example. It’s a turn based tactical game centered around strategic Mech combat. Developed by the creators of the award winning Shadowrun Returns series, alongside franchise founder Jordan Weisman, battletech represents a modern evolution of tactical Mech warfare.

    By using BATTLETECH as a case study, I’ll show you how to:

    • Structure a clear, actionable LDD
    • Communicate design intent effectively
    • Support collaborative iteration throughout development

    Pre-Documentation Analysis

    Before diving into the LDD, it’s essential to thoroughly analyze the game. Key components to review include:

    • Game Specifications
    • Gameplay and Core Loops
    • Game Mechanics
    • Game Economy
    • Core Features
    • Key Assets
    • Storyline and Lore
    • Missions and Objectives
    • Characters and Factions

    A solid understanding of these elements ensures that your Level Design Document aligns with the overall game design and communicates a cohesive vision.

    Why Use Notion for LDD ?

    I strongly recommend using Notion as your primary tool for game documentation. With its intuitive interface, rich content formatting, and seamless real-time collaboration, Notion is one of the most versatile platforms for generating, organizing, and sharing game design materials. Whether you’re working solo or as part of a team, Notion keeps everything accessible, structured, and connected.

    Ready ? Let’s head to Notion – BattleTech Level Design Document

  • I Turned My Campus Into a Video Game

    1. Overview

    This 60 credit project represents the culmination of my final year Practical Project as a Game Design student at Teesside University, Middlesbrough (2010/2011). Drawing from over eight years of experience designing maps for Counter-Strike 1.6 and Counter-Strike: Source, I developed a fully playable, team based multiplayer level set in a realistic environment, the very campus I studied on.

    This project was not only an academic requirement but also an opportunity to translate real world architecture into interactive game design using professional level tools.


    2. Project Objective

    The primary goal of the project was to design and implement a competitive multiplayer map for Counter-Strike: Source, showcasing my understanding of game level design principles. This included creating a balanced and immersive environment, optimizing the map for performance, and aligning the gameplay with Counter-Strike’s established mechanics. The project served as both a portfolio piece and a hands on learning experience that strengthened my technical and creative skills.


    3. Idea

    Imagine walking around your university campus and suddenly thinking,
    “What if this place were a Counter-Strike map ?”

    That’s exactly what happened to me during my final year as a Game Design student at Teesside University, Middlesbrough – UK. What began as a casual observation quickly evolved into the core of my final year Practical Project: designing and developing a fully playable multiplayer level set on my own campus.

    This article walks you through the concept, research, design process, and lessons learned, a combination of creativity, technical execution, and passion for level design.

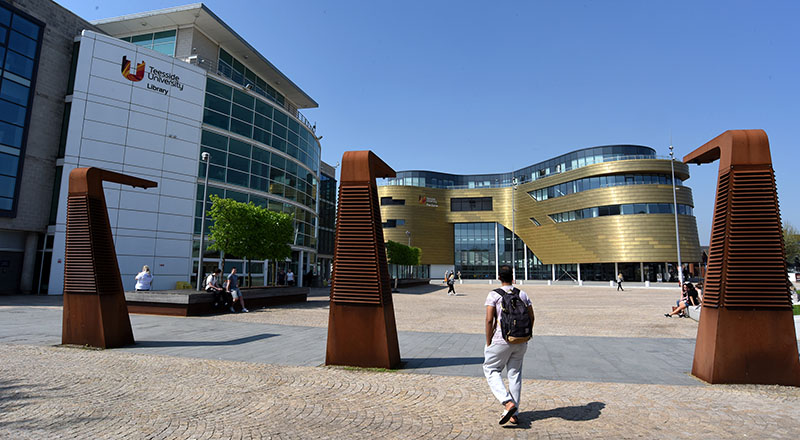
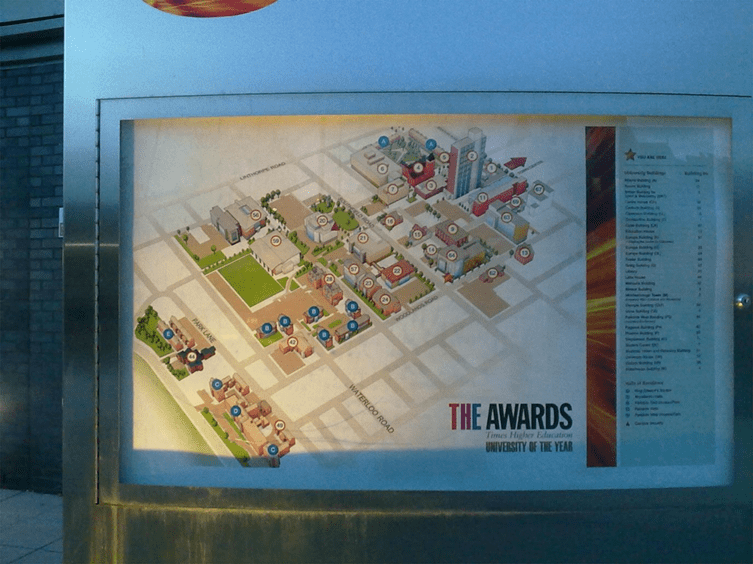
    The idea took shape one day as I was leaving a lecture. Near the Athena Building, I noticed a large neon board displaying a 3D perspective map of the campus. The stylized rendering, combined with the structure of the surrounding buildings, sparked an instant “what if” moment.

    I could clearly visualize routes, chokepoints, cover zones, and objective areas, all mapped to the real world environment I walked through daily. That moment of inspiration led me to pitch the concept to my supervisor. We both agreed: this would be a unique and ambitious final project.

    From there, the challenge was to translate real world architecture into compelling level design for one of my all time favorite games, Counter-Strike: Source. The project aimed to blend realism with the tactical, fast paced gameplay that defines the Counter-Strike series, while applying everything I’d learned about competitive balance, navigation flow, optimization, and spatial storytelling.

    This wasn’t just a student assignment, it was a personal milestone and a stepping stone into the professional world of level design.


    4. Selected Game for the Project

    The chosen game was Counter-Strike: Source (CS:S). The decision was based on several factors:

    • I had spent years playing and designing for the game.
    • Its editor, Valve Hammer Editor, is robust and familiar.
    • The game’s community values custom maps, providing real world exposure.
    • CS:S offers objective based gameplay that suits tactical level design, making it ideal for a project emphasizing balance and strategy.

    5. Game Engine

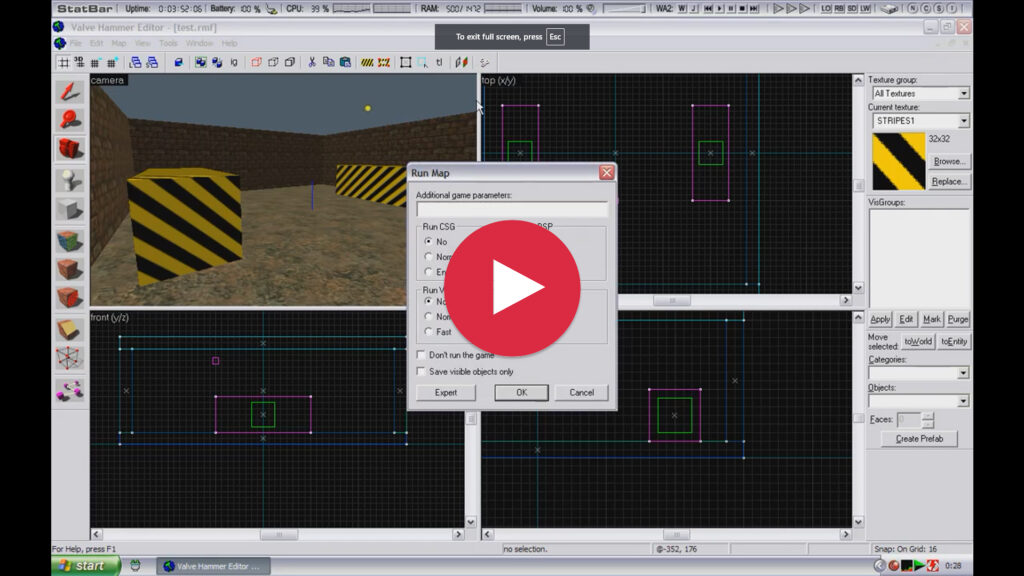
    The project was developed using the Source Engine, through the Valve Hammer Editor (VHE). The Source Engine was selected due to its:

    • Strong support for modding and custom content.
    • Efficient rendering and asset integration pipeline.
    • Personal familiarity and proven reliability over other tools I had tried.
    • VHE allowed for rapid prototyping, accurate measurement tools, and fine control over environment setup, all crucial for building a detailed, real world inspired level.

    6. Designing the Level

    Research & Preparation

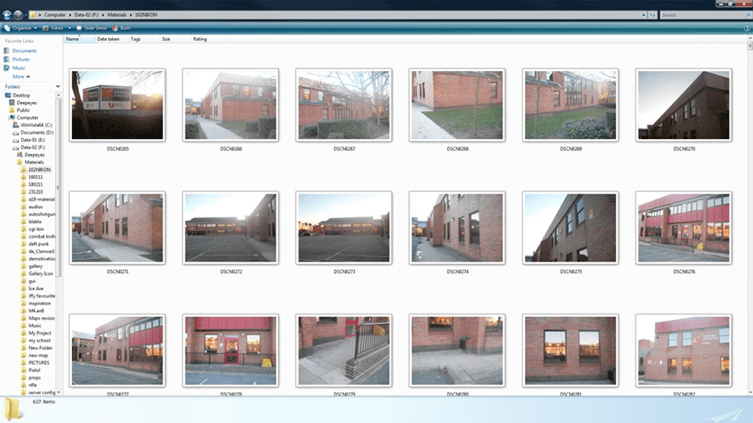
    I began with site research, using Google Maps, on site photography, and the university’s official campus map. Because interior access was restricted, the entire map was built outdoors only, using visual assets such as windows, walls, and building exteriors for scale.

    Building Index:

    1. Library
    2. Student Union building
    3. Grieg building
    4. Europa building
    5. Civilian houses

    Concept Development

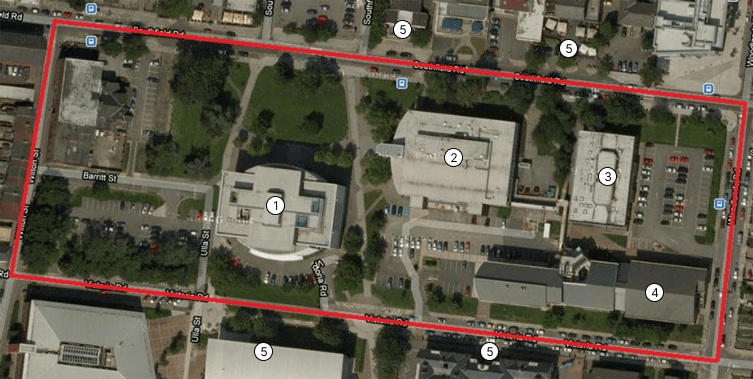
    A top down 2D map was created to guide layout planning. Photos were taken under favorable weather conditions to gather visual references and estimate measurements (e.g., a friend was used for scale). The final map focused on three core buildings:

    • Grieg Building
    • Student Union
    • Europa Building

    Measurements & Scaling

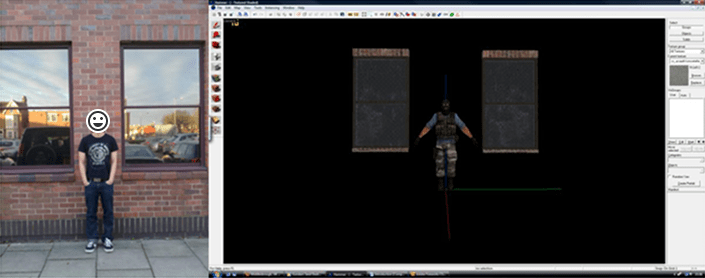
    Accurate measurements were essential. Since I couldn’t access official blueprints, I used a practical modeling technique:
    I asked a friend (approx. 175–180 cm tall) to stand between two windows of the Grieg Building. By comparing this scale with in game character models and using the windows as reference points, I created a proportional system.

    From there, I measured:

    • Building widths and heights
    • Door and window dimensions
    • Spacing between architectural features
    • Estimated distances between buildings

    This measurement method allowed me to scale the structures precisely inside the game editor, resulting in believable architecture that supported intuitive player movement and sightlines.
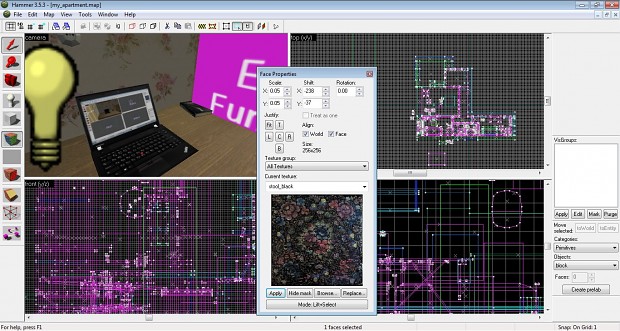
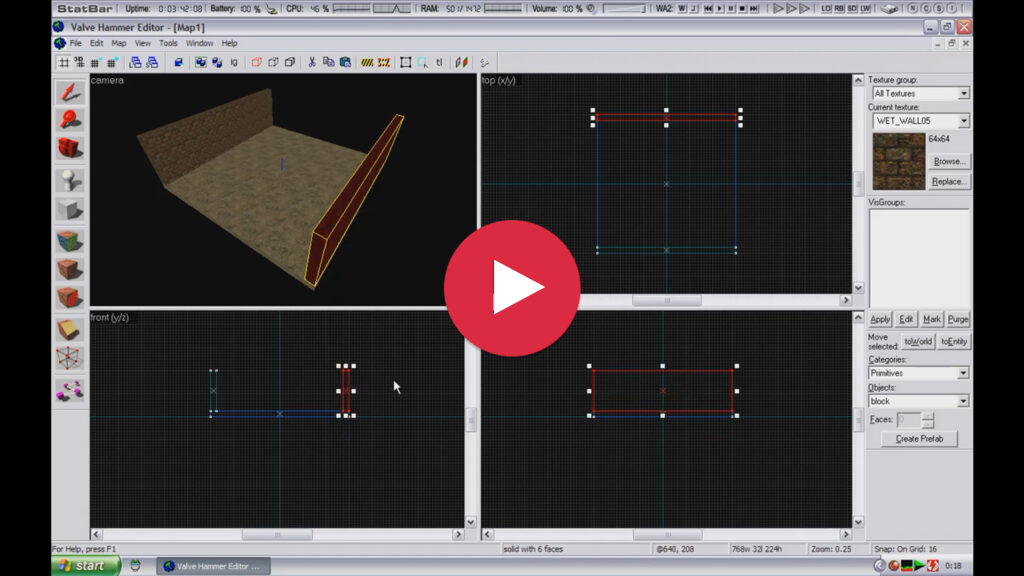
    Technical Design

    The Block Tool in the editor is primarily used to create basic geometric shapes such as arches, blocks, cylinders, spheres, spikes, tori, and wedges. Once a brush is placed, it can be easily manipulated stretched, resized, or reshaped directly within the editor, with no need for scripting or coding.

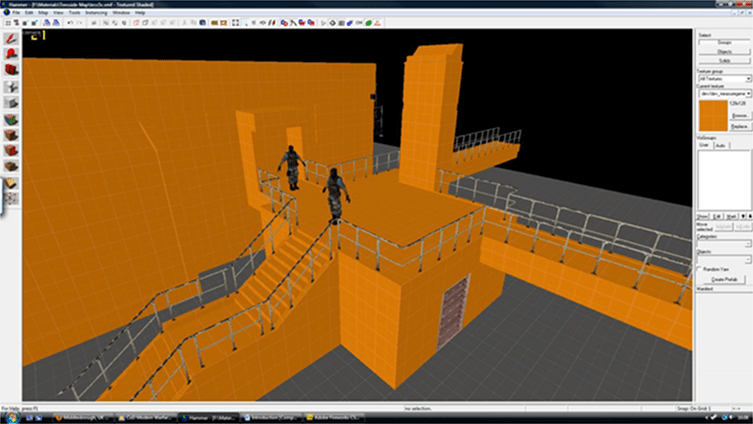
    I modeled the level’s architecture while applying core level design principles such as player flow, sightlines, and cover. Key structural elements included:

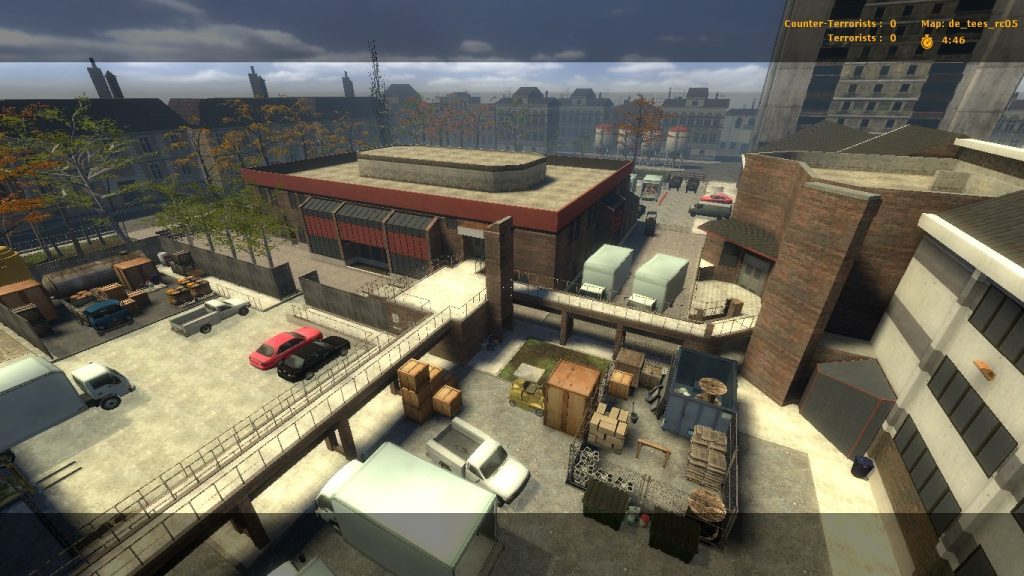
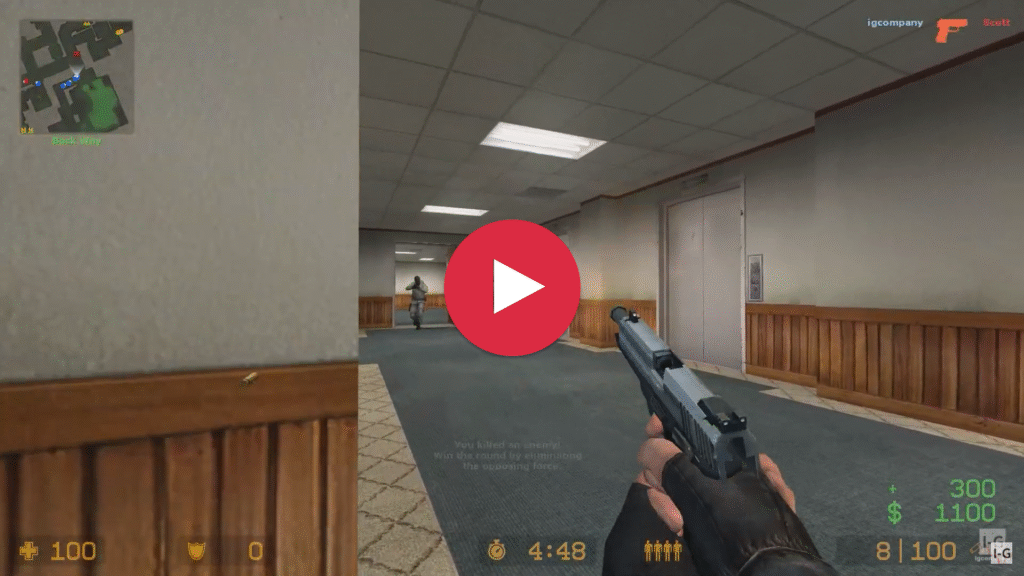
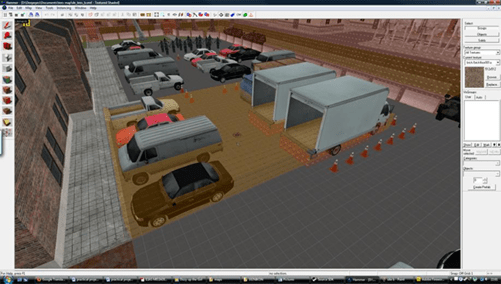
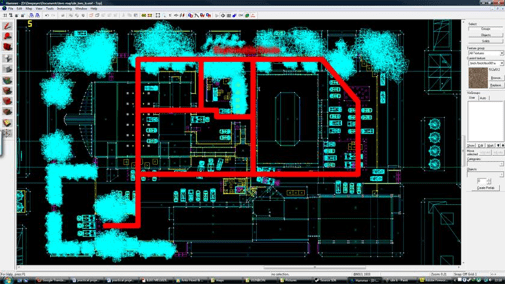
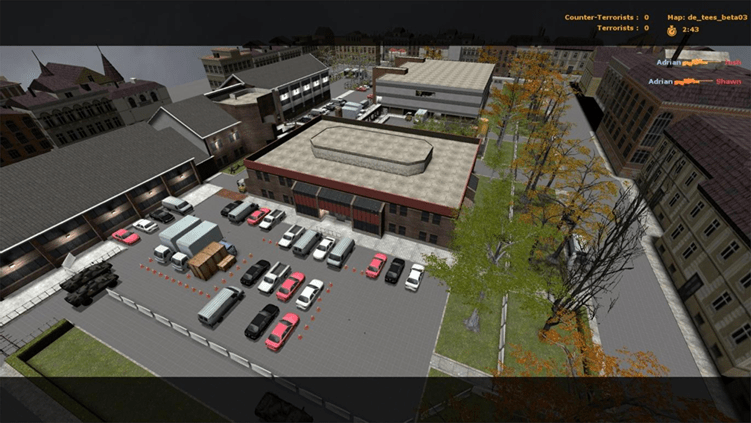
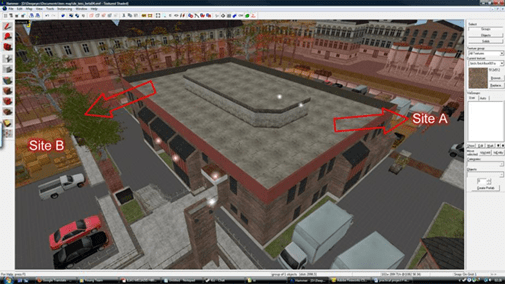
    Bombsite A: The parking lot at the Grieg Building. It contains valuable crates/goods that need to be either protected or destroyed.

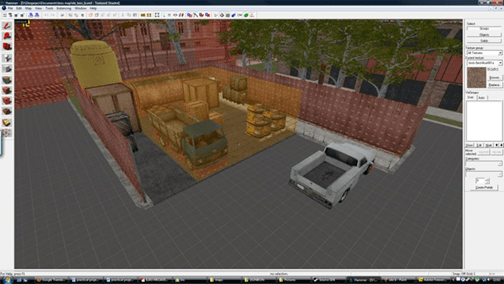
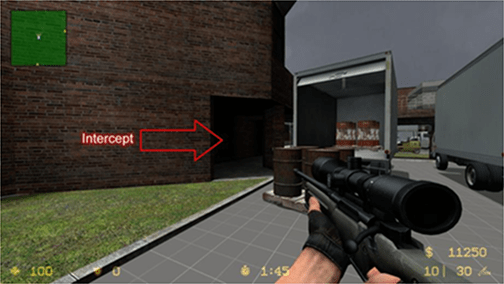
    Bombsite B: The loading bay at the back of the Student Union building. It consists of chemical tubes and toxic barrels. Some of the barrels can explode if hit by bullets or a knife.

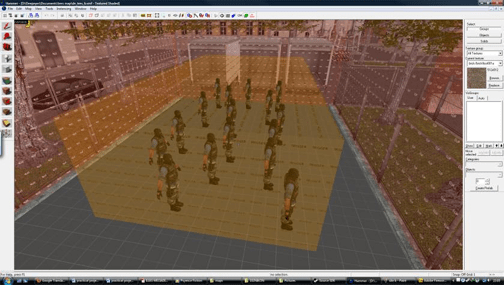
    Counter-Terrorist spawn point: Located in the parking lot near the Grieg building. It consists of 16 available slots. The yellow box surrounding the players is a trigger that serves as a buy zone for the Counter-Terrorist team only, meaning only Counter-Terrorist members can purchase weapons within this area.

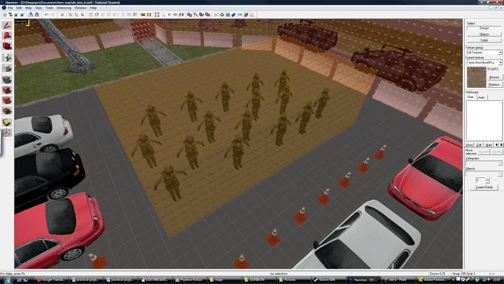
    Terrorist Spawn point: Located near the end of the Europa building. It consists of 16 available slots. The yellow box surrounding the players is a trigger that serves as a buy zone for the Terrorist team only, meaning only Terrorist members can purchase weapons within this area.

    Fast Paced Gameplay: Despite the map being quite large (from a character’s perspective), the author found that the map is easy to explore. The player can reach the main mission objective without needing to reroute. The entire layout is very easy to memorize, even for a beginner player. The invisible barriers around the map will keep players within the boundaries.

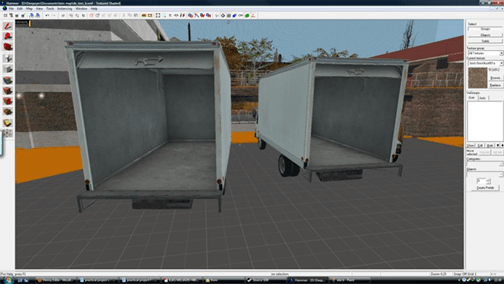
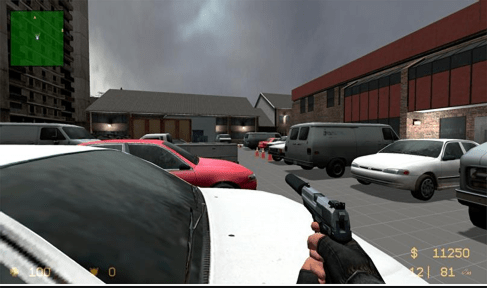
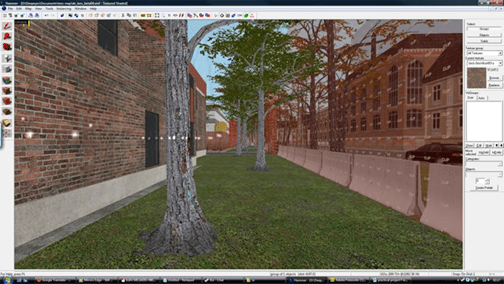
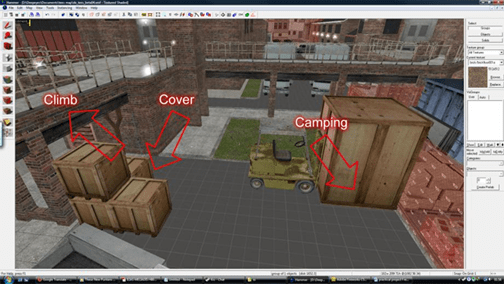
    Element of Surprise: By adding plenty of stationary trucks, players can jump in to hide. Some of the trucks are equipped with a pair of explosive barrels in their cargo area. These barrels will explode if hit by a bullet, killing anyone standing too close to them. To fill the gaps within the map, this problem can be solved by adding a variety of stationary vehicles and crates of different sizes. Players can use them for cover if spotted by the enemy or to climb to higher ground. The trees on the map also provide cover, as they contain collision detection that blocks both visual contact and bullets.

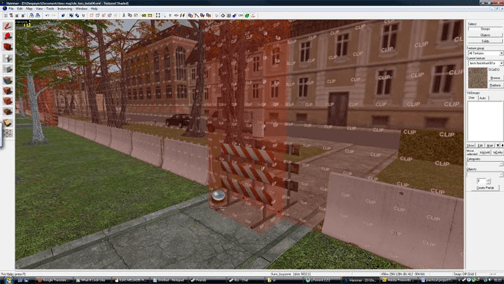
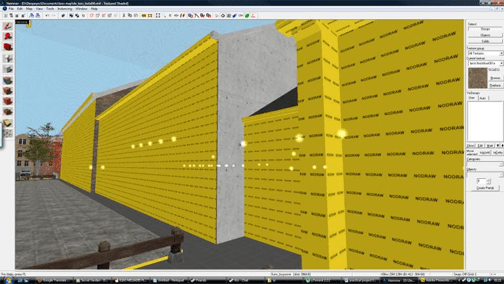
    Invisible Barriers: Surrounding the map is marked with the ‘clip’ texture, to keep the player within the designated mission objective area.

    Sky Box: The sky surrounding the map is made from a blue texture intended to represent a specific theme, which is a combination of a set of images.

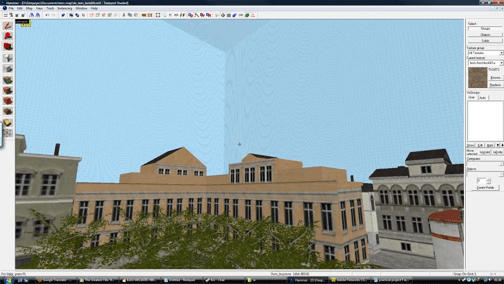
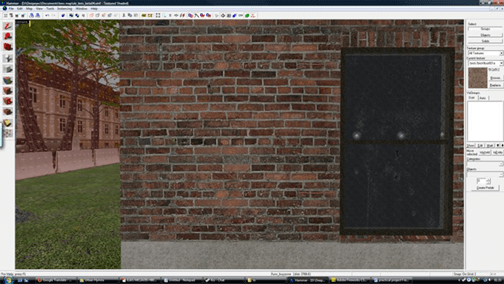
    Textures: Some of the textures in the map represent the actual materials of the structures, such as red bricks.

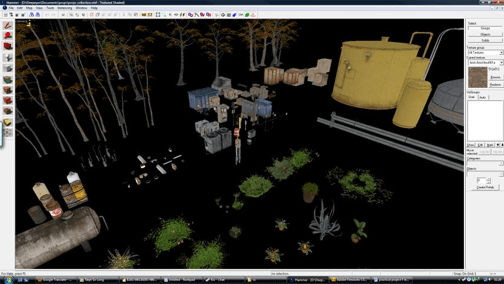
    Prop Distribution: List of props that currently are in use in general, 8 types of Vehicles, 7 types of Trees, 2 types of bushes, 5 types of Crates, 2 types of Barricades, 4 types of Barrels, 5 types of Tubes, 2 type of Fences and plenty of small items which work as additional details.

    The layout emphasized:

    • Simplicity for quick memorization
    • Multiple approach paths to key objectives
    • Strategic use of real world terrain and cover

    Each asset was scaled based on real world references, ensuring a believable environment that remained easy to navigate.


    7. Testing the Level

    Map Compilation Process:

    Once the layout, gameplay entities, and visual design were complete, the level was compiled using the Valve Hammer Editor’s compile tools. The process included:

    • VBSP: Converts geometry and brushes into the in game world
    • VVIS: Calculates visibility data for optimized rendering
    • VRAD: Processes lighting and shadows
    • The resulting .bsp file was then tested in Counter-Strike: Source for playability, performance, and bug checking

    The computer used to compile the map:

    • Operating System: Windows Vista Ultimate – Service Pack 2 – 64-bit Edition
    • Processor: Intel Core 2 Quad Q6600 (4 cores) @ 2.40 GHz
    • Memory (RAM): Corsair XMS2 DHX DDR2, 2 GB x2 (Dual Channel)
    • Hard Drives: Seagate 80 GB Seagate 1 TB x2
    • Graphics Card: XFX Nvidia GeForce GTX 260, 896 MB
    • Motherboard: Gigabyte X48-DQ6
    • Monitors: Acer X223HQ 21.5-inch x2
    • Sound Card: Realtek AC’97

    The map underwent several rounds of testing with bots in game. I conducted iterative play sessions to:

    • Analyze movement flow
    • Identify overpowered positions
    • Check visibility and collision issues
    • Evaluate time to engagement between teams

    Note: The compilation was run using the default lighting configuration. The author decided not to activate the HDR feature, as the map is still in the testing phase. Full lighting features will be available in the final version, which is currently under development.

    Later, I invited friends to playtest and gather human feedback. Through these sessions, I gained valuable insights into map balance, spawn placement, and visual readability.


    8. Improving the Gameplay

    Based on testing and player feedback, I made multiple refinements:

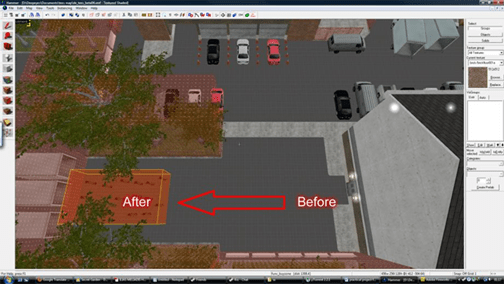
    Replaced fences with vehicles: To open up flanking opportunities and improve gameplay fluidity.

    Added more Trees: To improve aesthetics and additional protection for players.

    Adjusted spawn distances: To ensure fair timing to bomb sites for Terrorist Spawn Point.

    Introduced Destructible Elements: Such as explosive barrels, to discourage camping and added dark zones for stealth and ambush tactics.

    Disabled Roof Access: Access to the rooftops has been removed, especially for the Grieg building. If a counter-terrorist player managed to reach the roof, they would have the opportunity to observe both bomb sites and exploit this advantage to target terrorists attempting to plant the bomb.

    Introduce Shortcut: Players can climb on stacks of crates to bypass or escape from enemy barricades. For example, a player can jump onto a pile of crates to reach higher ground or access the bridge without using the stairs.

    Added more props: Crates, trucks, barrels for cover and tactical flexibility, these improvements turned a static environment into a dynamic and strategic gameplay space.

    Optimized Performance: By using invisible walls, special textures (e.g., nodraw, clip, trigger) to reduce compile time and improve framerate.


    9. Conclusion

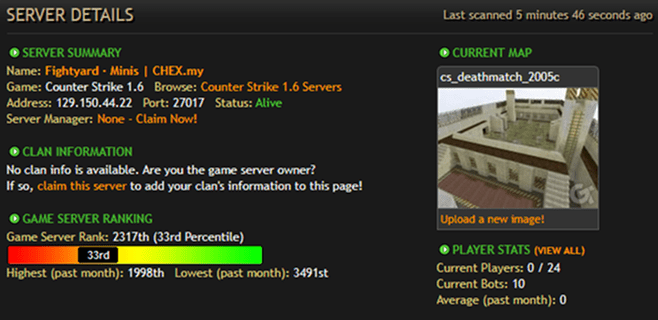
    This project was a highly rewarding journey that bridged academic learning with industry relevant practice. From concept to implementation, I applied core level design skills, technical understanding, and creative decision making. The map not only received positive feedback from playtesters but was even picked up by three public servers (two in France and one in the USA).

    Download the Map from the following link – Proton Drive

  • Basic Level Design for FPS Games

    Introduction

    Do you enjoy playing First Person Shooter video games, or are you interested in creating levels (maps) for Counter-Strike ? You can use a level editor, such as the Valve Hammer Editor, to create maps or levels for Counter-Strike.

    The Valve Hammer Editor (often shortened to “Hammer”) is Valve’s official level editor for games built with their GoldSrc , Source, and Source 2 engines. It’s used to create the game environments, including geometry, textures, and placing entities within the level.


    History

    Originally named “Worldcraft“, it evolved through various versions for different engines, with versions 3.x for Source and 5.x for Source 2.

    Functionality

    • Create and manipulate basic game geometry using brushes.
    • Apply textures to the geometry.
    • Place various entities within the level, including lighting, triggers, and other game elements.
    • Configure entity behavior and scripting.
    • Build maps with complex systems of logic and gameplay.

    Use Cases

    Hammer is the standard tool for creating levels in Valve’s games (e.g., Half-Life, Counter-Strike, Portal) and is also used by many modding communities for those games.

    Availability

    Hammer is typically included within the SDK (Software Development Kit) for the respective engine, allowing developers to create custom content. For Source 2, it’s available as a DLC for Workshop tools.


    Requirements for creating maps (levels) for Counter-Strike

    Step 1

    After downloading Counter-Strike (CS 1.6), the next step is to install and set up the Valve Hammer Editor. The video below was made for the non-Steam version of CS 1.6, but it is still valid for use with the Steam version, you will need to locate the following directory:

    SteamLibrary\steamapps\common\Half-Life
    SteamLibrary\steamapps\common\Half-Life\cstrike
    SteamLibrary\steamapps\common\Half-Life\cstrike\maps
    SteamLibrary\steamapps\common\Half-Life\valve

    Step 2

    The video below explains how to create a basic level (map) for Deathmatch mode. Pay close attention to all the steps involved in the level creation process.

    Keyboard shortcut keys:

    • Control camera – left click mouse (hold) + ASDW
    • Pan camera – right click mouse (hold)
    • Zooming in and out – mouse scroll

    Step 3

    After finishing the basic map, the final procedure is to compile the map (.rmf) into a playable level (.bsp).

    Congratulations, you have become a level designer!


    Alternative Download

    • I’ve provided the .RMF file, created using the tutorial – download
    • Alternative setup and tutorial – download

    My Level Design Experience

    I have been creating maps for Counter-Strike since 2002. They are available for download on 17buddies and Gamebanana.

    Counter-Strike

    Counter-Strike Source

    Some of my maps are hosted on a server in Singapore. You can join through the console by entering this address 129.150.44.22:27017

  • The Journey of Building a Team for My First Game Project

    The story goes back to 2012, when I had just graduated from university as a newly minted game designer. I returned home and made a plan to work at a game studio that was still relatively new in Indonesia at the time.

    To get in, I needed a portfolio in the form of a playable prototype. I saw it as the perfect opportunity to apply the skills I had learned during university.


    Gather the team (ID, UK, US)

    Additionally, I needed a team to create this portfolio, so I started with my closest circle. I have friends from university who are in the same situation as me, as well as friends from previous projects.

    • I made a deal with my first Game Programmer, who lives in the UK. We were in the same class and had worked together before, so I was familiar with his skills in using the Unity game engine. One problem solved (profile).
    • Next, I needed the help of a 3D artist to handle some game assets and textures. I knew someone from a previous project who was highly skilled in his field. He lives in the US, and when I invited him, he was interested (profile).
    • As for myself, I live in Indonesia. I can handle: Game Design, Game Research, Game Concept, Level Design, UI/UX, Sound Editing, and 3D Modeling.

    With that, the minimum team needed was complete.

    Important Note: as for game designers, understanding the technical aspects required for game development and recognizing the strengths and weaknesses of the development teams is highly beneficial when making decisions about what games their team can create.


    Game that fit our skills

    Okay, based on the skills we’ve mastered, we need a game concept that fits our skills:

    • Since none of us is capable of animating objects, the game doesn’t require rigs or complex animations.
    • Since none of us is skilled in art, the game doesn’t require artwork.
    • We don’t want to spend too much time working on level design, so the game doesn’t need complex level layouts.
    • Our target is a working prototype, so the game doesn’t require progression systems.
    • We want our game to be flexible, it should be playable with both a regular controller and a touchscreen.
    • The game should be expandable to accommodate new features during full production.

    Search for References

    I’m starting to look for a game concept that suits our skills, and more importantly, one that I will enjoy.

    • I like FPS, simulation, and RTS games. FPS isn’t a good starting point because it heavily relies on level design.
    • Although I’m skilled at creating level designs, it still takes a long time to make a good one.
    • Plus, testing these levels requires good bots and multiplayer, and we don’t have the time or resources for that. Also, there are just too many FPS games out there.

    Note: You can view my level design work through Gamebanana

    Simulation and RTS could be a great alternative, so I’m trying a combination of both. I looked at a list of games on my Steam account and found a good match: “Wargame: Airland Battle,” with over 400 hours of playtime. Okay, this seems like a concept I can try.

    I did deep research on what makes this game fun for me, from the FTUE (First Time User Experience), the theme, the game setting, the function of each unit, and so on. But I realized what’s missing in this game: “NAVAL BATTLE.”

    Then I realized there aren’t many modern naval battle games being released, so I decided to focus on creating a concept for a wargame with a naval battle theme.

    So, I started researching the types and classes of modern warships, their weaponry, sensors, strengths and weaknesses, the role of each ship, its missions, and how they work in real-world applications. I compiled everything into a Game Design Document, which gets thicker every day.

    Download the GDD from the following link – Proton Drive


    Game Asset

    Most of the units in this game will be warships and shipyards, which involve hard surface modeling which I can handle myself, but my only issue is texturing, which can be managed by a 3D artist, along with the additional warships that need to be modeled.

    • The asset itself will not require a rig for animation, since the only moving parts are the gun barrel, radar rotation, and silo door, which can be easily handled by the programmer.
    • The level design would consist of flat ocean surfaces, nothing complex, and can be easily handled by the programmer.
    • Game SFX will be handled by me. I’ve found tons of sample free audio through Google and YouTube searches, which will allow me to make clean cuts for each ship and weapon.
    • For UI/UX and the overall game theme, I plan to primarily draw inspiration from “Wargame: AirLand Battle”, while adding my own unique twist.
    • The rest, including the game code, will be handled by the programmer.


    Game Specification

    After I was confident with the game concept we wanted to work on, I shared this concept with the team members. After receiving feedback on what we needed

    • Platform: Desktop (Windows OS).
    • Genre: Simulation
    • Screen layout: Landscape
    • Camera: Bird Eye view
    • Input: Keyboard and Mouse
    • Player: Single player
    • Connection: Offline
    • Distribution: MODDB

    Project Management

    In addition to being a game designer, I also participate as a Project Manager, where I create tasks and distribute them. To simplify task distribution, we use the Trello app. I created a card for each team member. From these cards, I can see the status of each task, which greatly helps me monitor the progress of this game.


    Working Prototype

    After working hard for several months, we finally have a working prototype that can be played.

    Since we are still beginners, bugs or absurd things are events that we enjoy every day. For example, “The Drunken Torpedo”.

    We don’t stop at one, two, or even a million bugs. We keep pushing forward with the continuous iteration of game development.

    We try to make this game as authentic as possible. For example, in the Protection feature, modern warships commonly use CIWS as close defense against missile attacks.

    Aim for Full Production

    After we felt that the game had potential, I tried reaching out to several game studios/game publishers to secure funding for full production. I received a response from a representative of Wargaming. They requested a prototype of the game we were developing.

    After waiting for a while, we didn’t receive any funding because our concept didn’t meet their expectations visually. As I mentioned before, we lacked artistic skills and didn’t have the resources for that. In the end, we decided not to continue the development of this game. It would have been interesting if we had secured the funding to polish the game.


    Try Gunner Fury

    Download the Gunner Fury from the following link – MODDB

  • How Major Game Studios Operate Their Games

    Starting a Game Studio? Use This Workflow to Run Your Game Business Like a Pro

    If you’re planning to start your own game studio and especially if you’re working with clients, investors, or have a clear market in mind you need more than creativity. You need structure.

    The flowchart above illustrates a professional production pipeline, showing how to turn an idea into a published product, and how to organize your team and tasks efficiently from start to finish. Think of it as a game studio operation blueprint.

    Let’s break it down:


    1. Start With Market Alignment

    Your game idea must begin with real-world input:

    • Clients may have specific needs.
    • Investors may expect commercial viability.
    • Your market research may reveal a gap or opportunity.

    This input leads to a Product Brief a short document that captures the goal of the game, who it’s for, and why it matters.

    2. Let the Game Designer Translate the Vision

    The Game Designer takes the product brief and begins shaping the game concept. This includes:

    • Gameplay ideas
    • User experience goals
    • Technical feasibility

    They compile all this into a Game Design Document (GDD) your team’s creative and technical playbook.

    3. Use a Project Manager to Coordinate Production

    With a GDD in place, a Project Manager translates ideas into action:

    • Breaks down tasks across departments
    • Organizes timelines and priorities
    • Ensures cross-functional alignment

    This is where your production team activates:

    • 2D Artists (UI, icons, concept art)
    • 3D Artists (characters, environments, props)
    • SFX/VFX Designers (audio, animations, polish)
    • Developers (programming, tools, integration)

    Each contributes assets and functionality to the working build.

    4. Test, Refine, and Decide

    Once a working version is ready:

    • The Testing Team checks gameplay quality, bugs, and usability.
    • If the product isn’t ready, feedback goes back to the team for iteration.
    • If it passes quality standards, you’re ready to publish.

    5. Publish and Transition to Live Operations

    With a finished build:

    • The Project Manager handles submission, platform requirements, and versioning.
    • The game is published, but that’s not the end.

    Now comes the operational phase, including:

    • Marketing (ads, social, press)
    • Sales (pricing, launch strategy)
    • Live Ops (support, updates, events)

    And of course, continuous iteration based on player feedback and performance metrics.


    Why This Matters for New Game Studios:

    This workflow helps you:

    • Present your process to investors and clients professionally
    • Assign roles clearly, even with a small team
    • Avoid bottlenecks and miscommunication
    • Prepare for long term sustainability, not just a one off game

    Want the Flowchart ?

    This article is based on a flowchart that visualizes the entire process.


    Tip: Even If You’re a Small Team, Think Like a Studio

    You don’t need 50 people to follow this structure. Even a small indie team can adapt this model:

    • A single person may wear multiple hats
    • Tools like Trello, Notion, or Monday.com can help manage tasks
    • The GDD doesn’t have to be long but it should be clear

    The point is to treat your project like a business from day one!

  • How to Prepare Before Writing a Game Design Document

    A Beginner’s Guide to Preparing a Game Design Document (GDD)

    How to Start Strong Before You Start Writing

    Creating your first Game Design Document (GDD) can be intimidating, especially if you’re new to game development or unsure what’s required before building your game. Many aspiring game designers jump straight into writing gameplay features, only to get stuck halfway because the foundation wasn’t properly set.

    To help guide your process, this article breaks down a pre GDD preparation flowchart, showing two of the most common paths to starting a game project: Client/User-driven ideas and Game Designer initiated ideas. Whether you’re working with a client or building your own game, these steps will give you the clarity you need before writing your first GDD.


    Why Preparation Matters

    A GDD isn’t just a list of features, it’s the blueprint for your game. It defines what the game is, how it works, and how each team member will contribute to its success. Before you can write a clear and effective GDD, you need to make sure your idea is:

    • Viable within your resources
    • Aligned with market needs or client goals
    • Understood and approved by your team or stakeholders

    That’s where preparation comes in.


    The Two Sources of Game Ideas

    1. Client/User-Driven Projects

    Sometimes, a game idea comes from an external party like a company, brand, or client. In this case, your role is to translate their needs into a viable game concept.

    Steps in this path:

    • Collect business documents (if provided)
    • Break down possible business models
    • Collect references and feature expectations
    • Analyze and expand feature requirements
    • Do market research to ensure relevance
    • Discuss findings with team and stakeholders
    • Compile a pitch document
    • Present to client/user and revise as needed
    • Get approval
    • Then, write your Game Design Document v0.1

    2. Game Designer Initiated Projects

    If the idea comes from you or your internal team, your job is to ensure it’s realistic and strategically sound.

    Steps in this path:

    • Identify available resources (team, tools, time, budget)
    • Break down ideas that are achievable
    • Do market research and analyze trends
    • Explore possible business models
    • Discuss findings with your team
    • Compile a pitch document
    • Seek internal approval
    • Then, write your Game Design Document v0.1

    What’s the Outcome of This Process?

    By the end of this preparation phase, you’ll have:

    • A well researched and aligned game concept
    • A clear sense of scope and feasibility
    • A pitch document that communicates your idea effectively
    • Internal or external approval to proceed
    • The right context to begin writing a GDD that works

    For New Game Designers: Use This as Your Starting Checklist

    This process may seem like a lot, but it sets you up for success. Here’s why this preparation is especially useful for beginners:

    • It helps prevent scope creep or vague design decisions
    • It saves time by avoiding backtracking mid production
    • It encourages collaboration early in the process
    • It gives you the confidence to explain your idea clearly

    Even experienced designers benefit from this kind of structure, because great games don’t start with features, they start with focus.


    Want the Flowchart ?

    This article is based on a flowchart that visualizes the entire process.


    Ready to write your GDD ? Start with preparation, build with clarity, and design with purpose.

  • Simple vs Detailed Game Design Document

    Comparing a Simple GDD vs. a Detailed GDD

    To help fellow game designers understand the difference between early stage documentation and full production planning, I created a comparison between a Simple Game Design Document (GDD) and a Detailed GDD, using the concept of an Endless Runner game as an example.


    What’s the Difference Between a Simple and a Detailed GDD?


    Simple GDD

    The Simple GDD acts as a high level overview of the game. It’s often created at the early concept phase and serves to communicate the core idea quickly and clearly ideal for internal reviews, pitching to stakeholders, or team alignment before committing to full production.

    • Purpose: Concept validation and initial alignment
    • Content: Game vision, target audience, core gameplay loop, key features
    • Time to Create: 1–2 days
    • Usage: Quick reference for stakeholders or team leads
    • Format: Concise, clean, and visual (e.g., slides or brief docs)
    • Example Use Case: Pitching an endless runner game featuring collectible power shoes, basic upgrades, and progression mechanics

    Use this when you want feedback on the game idea without diving deep into execution.

    Download The Simple GDD from the following link – Google Drive


    Detailed GDD

    The Detailed GDD is a comprehensive and evolving document that supports the development team through production. Once the concept is approved, this becomes the single source of truth for every team involved.

    • Purpose: Guide full development across all departments
    • Content:
      • Game mechanics (detailed)
      • Art direction and references
      • Level and system design
      • Character details and animations
      • Audio requirements
      • Monetization and economy systems
      • UI/UX wireframes
      • Technical specs and dev tools
      • Production timeline and milestones
    • Usage: Daily reference for cross-discipline collaboration
    • Format: Living document (Google Docs, Notion, Confluence, or slide decks with embedded links)
    • Example Use Case: Outlining character speed scaling, obstacle generation logic, reward probabilities, and shop pricing in the endless runner

    Use this when your project enters production and you need tight coordination.

    Download The Detailed GDD from the following link – Google Drive


    Both documents serve different but equally important purposes in the game development lifecycle. Starting with a clear Simple GDD ensures a shared vision. Expanding it into a Detailed GDD ensures the team has the structure needed to execute that vision effectively.

  • How to Manage Game Asset in a Game Design Document

    Function

    In game development, team members often come from different backgrounds and may use varying formats when creating and naming assets. Without a standardized naming convention, inconsistencies can cause confusion, slow down production, and create unnecessary bottlenecks during asset implementation.

    Problem

    Let’s say two game artists are tasked with creating prop assets. One names a file “house” in English, while the other names it “rumah” in Indonesian. Without a shared naming system, it’s unclear whether these refer to the same asset, different versions, or where each should be placed. Now scale that problem to a library of thousands of assets. Verifying each one manually would take hours or even days wasting valuable development time.

    Solution

    The key is to define and enforce a clear naming convention from the start. A good naming system allows any team member to understand an asset’s type, function, and purpose at a glance without opening the file.

    For example, a UI asset named btn_nor_play_1 immediately communicates that it’s a button (btn), in its normal state (nor), associated with the play action (play), and it’s version 1. This level of clarity boosts productivity, minimizes miscommunication, and keeps pipelines running smoothly.

    See the image below for a visual example of how this standard can be applied.

    View full size

  • How to Manage Document Versions in a Game Design Document

    Function

    This section highlights the changes made across the latest and previous versions of the Game Design Document (GDD).

    Problem

    In a typical development cycle, the GDD evolves through multiple versions let’s say from version 1 to 5. Each version introduces new content, adjustments, or refinements. Now imagine a new update is released. Both new and existing team members are expected to catch up, but they’d have to re-read the entire document to identify what’s changed. That’s inefficient and time consuming, especially during active production.

    Solution

    The version update page solves this by clearly listing what has changed and on which pages. This allows team members to quickly spot updates without combing through the full GDD. It keeps everyone aligned and reduces communication friction during development.

    Refer to the example image below to see how this version tracking system is implemented in practice.

    View full size

  • How to Write an Effective Game Design Document

    Improving GDD Engagement Through Visual-First Documentation

    In my experience, not all developers or even team members from other departments are enthusiastic about reading traditional Game Design Documents (GDDs). This often leads to misunderstandings, outdated knowledge, and an increased number of questions directed toward the Game Designer, ultimately slowing down the development process.

    To address this, I’ve introduced a more accessible GDD format:

    📊 60% Visuals (Images, Diagrams, UI mockups)
    📝 40% Text (Clear, concise explanations)

    This visual-first approach significantly improves engagement. Team members who may not typically read long-form documentation can now absorb the necessary information quickly and intuitively. By presenting key ideas visually, the need for imagination or interpretation is minimized everyone sees the same vision.

    Below is an example of how this new format looks in practice:

    This format has proven highly effective in streamlining communication, minimizing repeated questions, and keeping the entire team aligned throughout development. By shifting from a text-heavy document to a visual first approach, we’ve made game design ideas easier to understand and faster to act upon.

    If you’re a Game Designer looking to improve cross team collaboration, I strongly recommend experimenting with a visual heavy GDD structure.

    For this new format, I use PowerPoint (PPTX) or Google Slides as the main tools both flexible, familiar, and great for presenting visuals and layered information.
    Be sure to pay close attention to Markers 1, 2, and 3 in the example below, as they highlight how the visual flow helps clarify core gameplay elements, UI/UX, and mechanics at a glance.

    1. Document Tags

    These tags serve to explain the status of the features to be used. Tags are represented by various code:

    • WIP (Work in Progress): Indicates that the feature is still in the design phase
    • Done: Indicates that the feature has received approval and is ready for development.
    • Pending: Indicates that the feature is awaiting approval
    • Scrap: Indicates that the feature will not be used

    2. Short Codes

    These codes function as unique identifiers for each feature. During development, task allocation or discussions can simply refer to the code, and all team members will immediately understand the feature being discussed. This approach effectively reduces misinformation, especially in games with numerous similar features.

    3. Reference Links

    These links serve to explain the features that will be developed. Including as many references as possible will facilitate the work of the development team.


    Download the GDD from the following link – Google Drive

  • A Beginner’s Guide to Becoming a Game Designer

    Want to Become a Game Designer? Start with a Board Game!

    If you’re passionate about becoming a game designer but unsure where to begin, there’s a simple and powerful starting point: design a Tabletop or Board Game.

    Why start here ? Because board games don’t require programming skills or software. All you need is paper, everyday objects, and your imagination. This hands on method helps you grasp fundamental game design principles like mechanics, balance, pacing, and player interaction.


    Step by Step: Designing Your First Board Game

    1. Pick a Simple, Fun Game to Study

    • Choose a classic board game that’s easy to learn and fun to play, like Snakes and Ladders.
    • Take notes on what works well. What makes it fun or frustrating ? What would you improve ?

    2. Identify Core Components

    • List the physical elements your version needs e.g., dice, tokens, game board, cards, etc.
    • This helps you visualize your design and understand how all parts interact.

    3. Define Your Target Audience

    Who is your game for ?

    • Children ? Teens ? Adults ?
    • Solo players or groups ?
      Tailoring your game to a specific audience helps guide your decisions about difficulty, theme, and tone.

    4. Modify the Experience

    Now add your twist:

    • Remove features that feel boring or repetitive.
    • Add new mechanics or rules to increase excitement.
    • Simplify or balance the game to improve the player experience.
      Example: Add power ups, shortcuts, or penalties to Snakes and Ladders for more strategy.

    5. Create a Prototype

    • Sketch your game board and rules on paper or cardboard.
    • Use whatever is available like LEGO bricks or coins to represent pieces.

    6. Playtest and Refine

    Test your game over and over. Pay attention to what works and what doesn’t:

    • Is the game too long ? Too easy ? Too random ?
    • Are players having fun or getting confused ?
    • Revise rules or components as needed.

    7. Play with Others

    • Once it works solo, invite friends or family to play.
    • Watch how they engage with the game and collect honest feedback.

    8. Iterate, Don’t Hesitate

    • Keep refining your game through feedback and repeated testing.
    • Your goal: a smooth, balanced, and enjoyable game experience.

    9. Avoid Over Designing

    • Don’t drift too far from your original vision.
    • Adding too many mechanics or changing genres can make the game feel unfocused.

    Final Step: Document Everything

    Now that you’ve play tested and iterated on your design, it’s time to write your first Game Design Document (GDD).
    Include:

    • Game overview and goal
    • Target audience
    • Core mechanics
    • Components list
    • Rules and variations
    • Playtesting notes and feedback summary

    This GDD is your blueprint, a professional step toward designing digital games in the future.


    Congratulations, You’re a Game Designer!

    You’ve just taken your first real steps into the world of game design. Whether you stay in the tabletop space or move into video games, the skills you’ve built, prototyping, testing, iterating, and documenting are essential in every game design journey.

    Now go create something awesome!


    Real World Implementation

    An example of a game I have worked on using this technique is a simplified version of Ludo, designed to make the gameplay much faster.

    The procedure I have carried out:

    • Reduced the board size by 60%.
    • Applied 60% of the original game’s rules.
    • Used 50% of the original game’s tokens.

    Play the game from the following link – Telegram